 |
| Obviously my parents survived to see the next generation of craziness :) |
So I had the realization months ago that my son won't be able to experience some of the same things that I did growing up because we move so much. I lived in the same house for 15 years while growing up with the same trees, the same cantankerous cat, and the same doorways that were all sorts of marked up from all of mine and my brothers and cousins shenanigans (as my Nonnie would put it). They were also marked with those amazing little marks that had names and dates and ages next to them that showed how big we were. They were more than just doorways to the kitchen and living rooms, they were time capsules for my Mom of when we were small enough to fit in her lap and short enough to not make it to the top of the tallest tree in the yard inducing mild heart attacks for her.They were reminders when we came home with Mohawks and tattoos that at one point in time we were her innocent little babies and somewhere deep inside of us that child still resided. I'm convinced those doorways even saved our butts a time or two because of those innocent memories they brought back to life. I realized however that my son doesn't have a doorway that will follow him wherever he goes and so I set out to make him one, because lets face it...he's my child and will need all the help he can get to stay out of trouble.
First step was to hit up my local Home Depot (Frankly I'm a Lowe's girl too but on this day Home Depot was closer in my travels so it's where I ended up). I bought a 6 foot piece of wood from the clearance section for 51cents because I'm cheap and love a good deal :)
 |
| I love my painter's overalls :) although they bring out my cheesy factor ;p |
Second step was to stain it. I always keep a can of Bombay Mahogany Gloss 480 by Minwax at the house because I love the color, it goes with our decor, and frankly why deviate from a great thing? However any color you choose will be awesome. I have one sister who loves everything darker and another who loves everything lighter so I guarantee they keep different shades on hand :) First off, if you want to round off your edges like I did now is the time to do it. Take a hand sander or simply a piece of rough grit sand paper and go to town on the corners and edges. afterwards you can move on to staining just make sure you get the sawdust off. I stained it with the help of Monkey and Hubby and let it dry overnight and then sanded it lightly and stained it again.
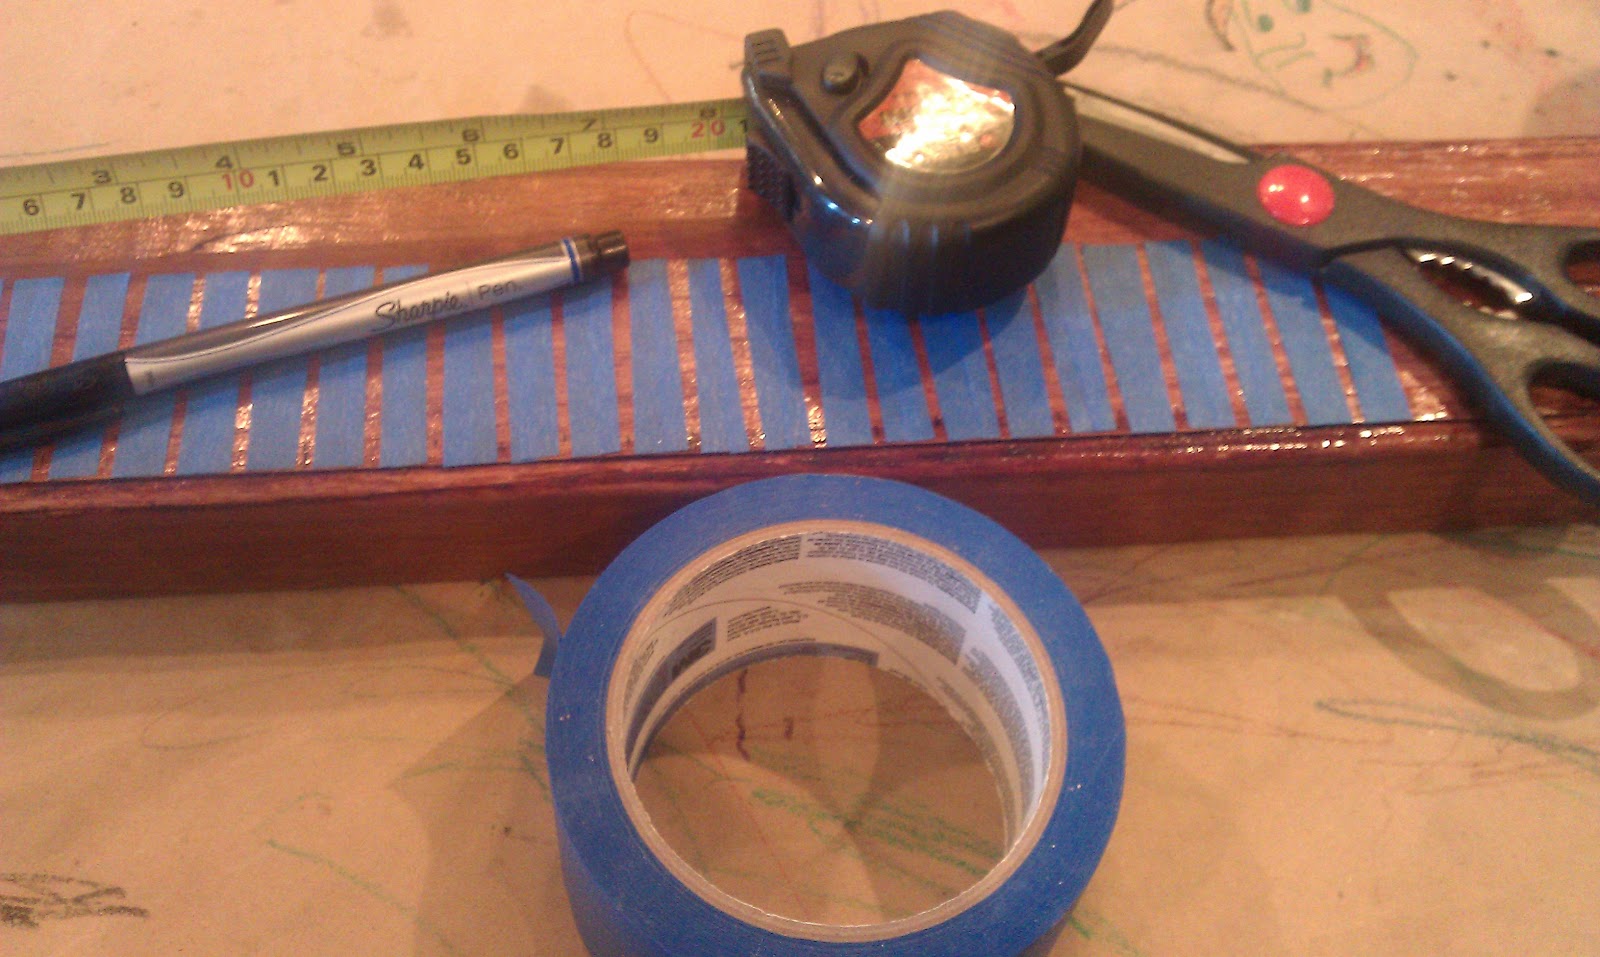
Third step is the "tedious why did I choose to do this" step...You'll need painters tape, measuring tape, and lots of patience. I chose to mark out the wood like an actual ruler with inches, half inches, and feet. Each measurement was a different amount out. I started by measuring the wood exactly and marking it as being 6'5". We have tall people in our family so it gives him room to grow. Next I measured each foot and put a small piece of tape where the line would be. I did the same for the inches and half inches. Next I went through and measured from the side of the wood for every Foot put a piece of tape 1 1/2 inches up, Inch was 1 inch up, and 1/2 inch was a 1/2 inch up. It looked a little something like this...

Then I went through and painted the lines in and let them dry...and peeled the tape off...and cried. Paint is stupid for this project and I hate it. It bled under the painters tape and all my beautiful work was for nothing. All three hours of work down the tubes...So I started over.

 Step one...Back at Home Depot I bought a piece of wood that was beautiful and cost about $2 and change. I did all of the steps all over again but this time I used a Sharpie Paint Pen instead of paint. No drying time needed and it doesn't drift under tape and make you cry. :) After that I stenciled in numbers next to the feet so we know what is what. I may change it up in the future and add some cute house numbers that are nice and shiny if I find some on a good deal.
My Hubby put a hanger on the back and hung it on the wall for me. You need to make sure that where ever you started your ruler is where you hang it from. Ours started at 6" so we hung it 6" off the floor. Once you have hung it up you can stand your Little One next to it and measure away! The best part is that when you move you simply take it down and move it with you!
Everyone deals with kids growing up and everyone deals with the differences between their childhood and the one they are providing for their child. The thing to figure out is what is important to you and what you can do to make it happen. Our family is about providing a sense of normalcy in a world of change and this is one thing we can do to help with it. What is yours?
 |
| His first trip to the Zoo! He's such a big boy! |
Best Wishes,
Jules, Hubby, and Monkey
No comments:
Post a Comment