Saturday, March 9, 2013

DIY Growth Chart!!!

Obviously my parents survived to see the next generation of craziness :)
     So I had the realization months ago that my son won't be able to experience some of the same things that I did growing up because we move so much. I lived in the same house for 15 years while growing up with the same trees, the same cantankerous cat, and the same doorways that were all sorts of marked up from all of mine and my brothers and cousins shenanigans (as my Nonnie would put it). They were also marked with those amazing little marks that had names and dates and ages next to them that showed how big we were. They were more than just doorways to the kitchen and living rooms, they were time capsules for my Mom of when we were small enough to fit in her lap and short enough to not make it to the top of the tallest tree in the yard inducing mild heart attacks for her.They were reminders when we came home with Mohawks and tattoos that at one point in time we were her innocent little babies and somewhere deep inside of us that child still resided. I'm convinced those doorways even saved our butts a time or two because of those innocent memories they brought back to life. I realized however that my son doesn't have a doorway that will follow him wherever he goes and so I set out to make him one, because lets face it...he's my child and will need all the help he can get to stay out of trouble.
     First step was to hit up my local Home Depot (Frankly I'm a Lowe's girl too but on this day Home Depot was closer in my travels so it's where I ended up). I bought a 6 foot piece of wood from the clearance section for 51cents because I'm cheap and love a good deal :)
I love my painter's overalls :) although they bring out my cheesy factor ;p
    Second step was to stain it. I always keep a can of Bombay Mahogany Gloss 480 by Minwax at the house because I love the color, it goes with our decor, and frankly why deviate from a great thing? However any color you choose will be awesome. I have one sister who loves everything darker and another who loves everything lighter so I guarantee they keep different shades on hand :) First off, if you want to round off your edges like I did now is the time to do it. Take a hand sander or simply a piece of rough grit sand paper and go to town on the corners and edges. afterwards you can move on to staining just make sure you get the sawdust off. I stained it with the help of Monkey and Hubby and let it dry overnight and then sanded it lightly and stained it again.
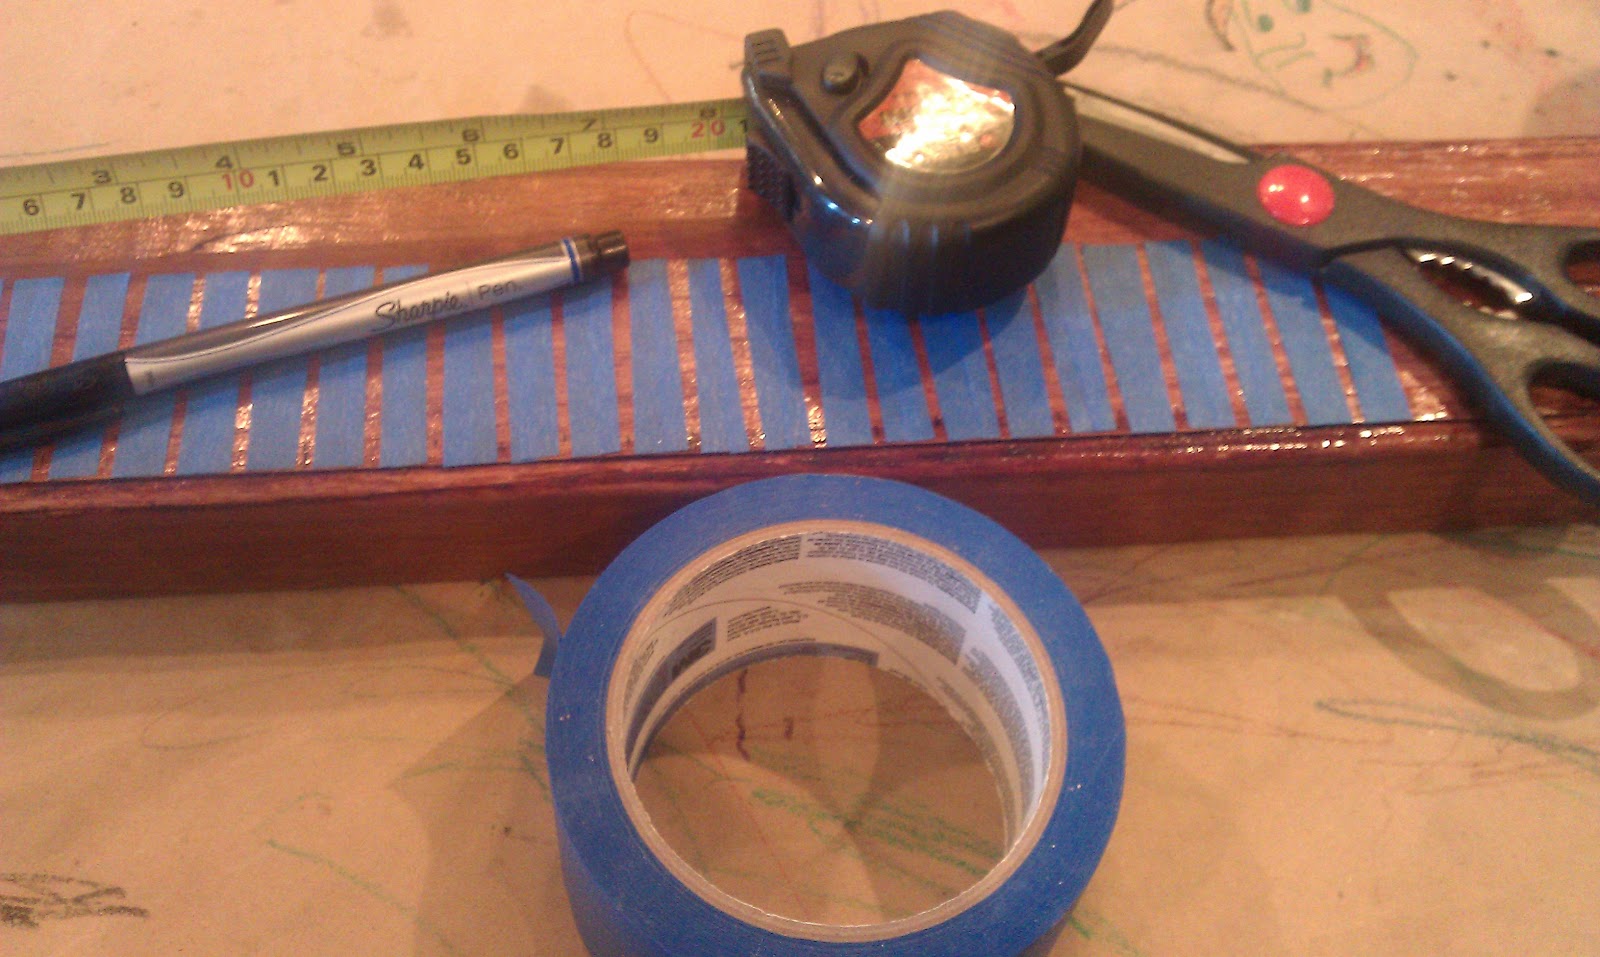
  Third step is the "tedious why did I choose to do this" step...You'll need painters tape, measuring tape, and lots of patience. I chose to mark out the wood like an actual ruler with inches, half inches, and feet. Each measurement was a different amount out. I started by measuring the wood exactly and marking it as being 6'5". We have tall people in our family so it gives him room to grow. Next I measured each foot and put a small piece of tape where the line would be. I did the same for the inches and half inches. Next I went through and measured from the side of the wood for every Foot put a piece of tape 1 1/2 inches up, Inch was 1 inch up, and 1/2 inch was a 1/2 inch up. It looked a little something like this...
Then I went through and painted the lines in and let them dry...and peeled the tape off...and cried. Paint is stupid for this project and I hate it. It bled under the painters tape and all my beautiful work was for nothing. All three hours of work down the tubes...So I started over.
    Step one...Back at Home Depot I bought a piece of wood that was beautiful and cost about $2 and change. I did all of the steps all over again but this time I used a Sharpie Paint Pen instead of paint. No drying time needed and it doesn't drift under tape and make you cry. :) After that I stenciled in numbers next to the feet so we know what is what. I may change it up in the future and add some cute house numbers that are nice and shiny if I find some on a good deal.
    My Hubby put a hanger on the back and hung it on the wall for me. You need to make sure that where ever you started your ruler is where you hang it from. Ours started at 6" so we hung it 6" off the floor. Once you have hung it up you can stand your Little One next to it and measure away! The best part is that when you move you simply take it down and move it with you! 
     Everyone deals with kids growing up and everyone deals with the differences between their childhood and the one they are providing for their child. The thing to figure out is what is important to you and what you can do to make it happen. Our family is about providing a sense of normalcy in a world of change and this is one thing we can do to help with it. What is yours?


His first trip to the Zoo! He's such a big boy!


Best Wishes,
Jules, Hubby, and Monkey

Thursday, February 21, 2013

"I Love You" Cupcakes!

My Valentine's Gift from Hubby :) We have a thing for Monkeys...
   If your life is anything like a normal mom's it involves re-planning the "important" holidays around your schedule. Valentine's Day, Birthdays, and Anniversaries all take a back seat to the errands, laundry, dinners, work schedules, and potty training even! Hubby and I have a weird timing to our anniversary(a few days after Christmas :D) so we have actually agreed to celebrate it during the Summer. Any holiday that happens during the week gets moved to the weekend, Birthdays get celebrated on the weekend with the most family member availability, stop me when this starts sounding familiar...However, Moving Holidays doesn't mean ignoring them completely on their actual day. This past Valentine's Day my Hubby and I did little things all week and then had our date night on the weekend! It was fun and honestly I enjoyed having a week of romance and cheesiness. 
   One of the things I did was Valentine's for Hubby's Troop from Monkey. But since I refused to write over 40 Valentine's I did paper Valentine's for the girls and cupcakes for the boys! They were simple and elegant and frankly, beyond delicious. So good in fact that I decided to share my amazing secrets with all of you. 
    First off, when you shop for cake mixes (and admit it, we all use them...) buy the ones labeled supreme, fudge, or anything hinting at awesomeness. Same with the icing. It's easier to add one or two ingredients rather than three or four to make it decadent. We're about shortcuts so take advantage of them when available! 
I started with Betty Crocker's Super Moist Triple Chocolate Fudge cake mix. It calls for Oil, Water, and Egg and the specifics are on the back of the box. I put the wet ingredients in a large bowl and added one large packet of sugar free, fat free chocolate pudding ( the "instant" mix). Mix them together with a hand mixer until the pudding starts to set a little and then add the cake mix. Don't over mix the cake batter or else it will be a tough cupcake. Cut up some fresh strawberries, about 1 cup worth, and fold them into the batter with a spatula. Spray a pan with Pam Butter Spray, normal Muffin pans work too but I prefer Mini Muffin pans simply cause they're cuter and work better with little kids and men :). As well, normal size muffin pans tend to stick more so use cupcake liners if you have them.  Fill them up 3/4 of the way with the cupcake mix. They will look a littler fuller than a normal batter makes them look because of the diced strawberries in the batter.
Bake at 350 degrees for the time stated on the box. If your kids are like mine this is their favorite view in the house. Monkey always likes to sit in my lap and stare in the oven and say "Whooooahhh!!!" like it's the coolest thing he's ever seen.
   Once they are done let them cool for about 2 minutes and then pop them out of the pan. I use a butter knife personally and take them out one by one but that's just my OCD kickin' in :) Place them on a cooling rack and let them cool completely. And I mean completely! Otherwise the icing will melt and slide right off the top of them and while still delicious and slightly funny it's also a little heartbreaking so leave them alone until they are done!!!

     Next comes the Icing. Pop open a gallon ziplock bag and fold the top halfway down. you should be able to slide your hand under the fold and around the bag to hang onto it while filling it. Take whatever icing you chose and spoon it into the bag and then unfold the top and twist it. It should look like this...
   Note my hand around the bag. I use my pinky and ring finger to do the squeezing and my thumb and fore finger to keep the icing from going the wrong way. Once you have pushed all the icing into the corner snip a tiny bit off the corner of the bag. Some people snip first, insert an icing tip, and then fill with icing but I like simple and this way floats my boat. Whatever way floats yours works too!
    Next up is actually icing the cupcakes. Start on the outside of the cupcake and work in a spiral towards the middle and lift up a bit at the end. Don't worry about it looking pretty. It will be hidden later by cute little toppings :)
   Aren't they just so fun and simple looking? Now to spice them up a bit!


Now take a couple of big Strawberries and cut them up in little slices. Press them into the top of the icing at an angle so they stick up a bit. As they sit they will get juice in the icing and start to slide so you want them to be propped into the icing enough to stay put.  Doesn't that make it so simple and beautiful? And who doesn't like Chocolate and Strawberries? As well you could place some candied oranges, Sweetheart Candy, Edible Flowers...the options are endless with this cupcake. Get creative! The best part is that the active time is only about 45 minutes total. About 15 in the beginning and 30 to decorate. And they will fly off the plate guaranteed :) 


   We talk all the time about the importance of family and a lot of the time everyone focuses around Valentine's day on loving the ones around them. Unfortunately it is with things and not time. Maybe this year when you get around to finally celebrating with your Love you can make a point of having more time out of the kitchen and more time in their presence. Spending time together is just as important if not more important than everything else so make the most of the help around you to cut your project's time down. And when people compliment you on the awesomeness, and they will, just smile and act like it is made from scratch. Real Moms use shortcuts, Real Women use discretion in telling people ;) Happy belated Valentine's Day Everyone!
 
                                  Best Wishes,
                              Jules & Monkey


Wednesday, February 13, 2013

Blessed but Slightly Stressed!

   Recently there have been some changes in our home that have been a blessing in disguise. I have had the opportunity to change careers. Those who know me know I love being in the Administrative field and that I excel at it. However recently my job changed locations so my Hubby and I made the decision for me to change careers. It has meant a couple of things.
    
    First, I am in school temporarily for Real Estate. I'm loving maintaining my previous schedule for the time being as it eases the stress that change can bring. Secondly, it means that I am a Stay at Home Mom at the end of this week! Life is crazy as I prep for this change. Not only will I be working from home as a Real Estate Agent but I will be responsible for a toddler who understands everything but the word "No"! So being the Type A personality that I am I decided to do a few things in preparation.
                                                                                                                                                           
My Apple Pie! I bake when I'm stressed...


    Lists, Lists, Lists!!!! Did I mention lists? First up is cooking. I love my go to recipes but I was in need of some new ones and decided to take advantage of the few days in between changes to find some to try. I found a few via Pinterest as always and some more in some long lost cookbooks that my inspirational Mom gave me at Christmas.Here's a blog, JustB, that I used for some. She has great tasting, easy to prepare, one dish meals that just knock it out of the park every time! They're easy prep, low cost, and kid friendly so I marked 'em, put them on my Grocery List, and headed to the store. So far they have all passed with flying colors. As I go through them again I plan on posting them for all you wonderful people! 

Heisman Trophy Game at MSU! Wife of the Year Award :)
      Next up was finances. My Hubby and I decided this year was our year to work on debt and tax time is a big part to that. I spent some time with him figuring out what we needed to take care of. As well, I reorganized our budget to fit the different income and therefore different lifestyle we have for a while. I found that our bank has a great money management tool as well as a savings tool so we can see our progress as the bad numbers go down and the good go up! Check out your bank and see what online tools they offer for free to help you organize and get a handle on your money. We are slowly learning to make our money work for us instead of the other way around! 
      
      As well, I tackled the big dread...my Home. I'm pretty organized but between Christmas, Work, Toddler mess, and just sheer laziness from exhaustion (yes type A's deal with that too ;p) my house had spiraled out of control. I went through the house and cleaned like a maniac from toilets to  laundry. I then found a great cleaning schedule that I could printout and put on my fridge as a daily upkeep reminder. I posted it on the bottom of the blog for easy access but you can also find it here at The Time Warp Wife. She is a fantastic christian mom and author who lays out the way to a clean house in a short amount of time. I'm loving the schedule plus it can be altered to fit your days.
Mardis Gras Parade 2013
      
      Then came my big issue...my son. Because of the career change, our finances have changed which means no more nursery. I now have the responsibility of teaching him what he needs to know to, not only catch up, but keep up so he will be ready for preschool. AAAHHHHHH!!!!!!!! I'm freaking out! So I have been going through trying to set a schedule up so he gets what he needs first and foremost and I still have time to do work. It's not going to be easy but it needs to happen. Yet again Pinterest to the rescue! I have found so many free teaching aids for numbers and letters that can help him. As well, we are setting his Leap Pad up so I can use it to teach him as well rather than just entertain. I have been researching free activities around town so he can have interaction still with other children and have been surprised! Check out your local library, your town's website, local churches even. They all offer free activities geared towards little children for little to no cost. Talk to friends with kids. Set up one day a week to meet so you get some mom time and the kids get some interaction. As well, I talked with Monkey's nursery and learned that they do offer daily rates so if I need a day to show houses or have meetings all day I can pay a much lower price for him to be there for the day. Check out a local nursery in your area and see if they offer you the same type of situation. It's definitely still a work in progress but my focus has been on schedules and activity. Monkey needs a schedule with his temperament to maintain his happiness level and activity to keep him out of trouble.
   
     This whole situation has been a learning experience with a very sharp learning curve and I personally don't like change. It messes with me normally but this time around I have had the extra blessing of feeling at peace with what is happening. Throughout everything that happens I always know that change is God's way of steering me towards the direction he wants me to go. I am slowly learning how to hold onto Isaiah 41:10 (NIV) "So do not fear, for I am with you; Do not be dismayed, for I am your God. I will strengthen you and help you; I will uphold you with my righteous right hand". I am learning that God will use situations to mold me the way He sees fit and my only responsibility is to trust Him and take that next step. However in true Type A style, I make lists to make sure that I can make it through that next step! For me it helps to ease the scariness of change itself.
  
    I know this post has been a bit different but hopefully there has been something of use that you can glean in order to help ease your life up a little bit. After all that what this is about, a little extra work now to ease up work later so we all have time for what is truly important - Our Families! 

Mardis Gras Parade 2013 ~ Such goofballs having fun!


Best Wishes,
Jules, Hubby, & Monkey

Friday, February 8, 2013

Baby Shower Fun!

Playground Day!
  
 I had the opportunity to host a baby shower recently for a new friend of mine from church. I have to admit it was a little nerve wracking from the get go solely cause I don't "do" baby showers. I'm not that girl who gets excited about the color pink and fluffy things that play obnoxious baby songs. I tend to lean more towards football games and playgrounds if you get my drift. I was raised by a mom who desperately wanted a little girl and got a little tomboy...except now that I have a little boy of my own I find myself compensating for the boyish behavior by being more girly! So with all of that in play and the beautiful realization that my friend Jessica is the same way I set out to plan a non-girly Baby Shower for her and the third little girl that she is having (ironic, I know)

   I decided on a Grey and Yellow theme from the beginning since it is sweet and simple without being obnoxious. I have a thing for baby animals period but in this case, Elephants! After that it was pretty easy. I went on a plundering tour of Pinterest to find some games and decorations and here is what I found...
Wishing Well Station and "Guess that Number!"

   I decided to do a homemade "It's a Girl!" Banner based on Shanty2Chic's free printables. The website can be found here :) It was incredibly easy but a little time consuming. I printed everything out on plain colored paper and cut it out. I then laid them out on some Scrapbooking paper and cut them out again with about an inch around the perimeter. 

I taped them together, Punched holes in the top corners and laced them on some ribbon. My Hubby helped me hang it in our kitchen across our windows. All in all it took me about two hours without the help of Monkey or his cat :D


   Next I found this girl who is alllll about her baby showers and was diggin' the color yellow and utilized some of here free games. They come as a PDF so you just download and print as many as you need and then you still have it for later on down the road too ;) Most came multiples to a page so I curled up in front of the TV and went to town just cutting away one night. My Hubby came to the rescue and looked up the answer to one of the animal games for me the day of the shower so make sure you do that the day before at least!

   As well I found an amazing Lemonade Punch that I still make and drink almost every week! It's really easy, and to boot I cut up two lemons and placed them on a Reynold's Wrapped plate and froze them. Nobody likes watered down drinks so what better way to cool lemonade down than with frozen lemons!
As you can see, I used Lemons allll over the place for decoration as well!

   Food-wise I kept things simple for once. I ordered the cutest little cake and cupcakes from Sam's Club for crazy cheap as a center piece.
I looove Polka Dots so I use them every chance I get :)
I made Ham with Baby Swiss Sandwiches and Turkey with Baby Swiss Sandwiches and let everyone dress them themselves. Deviled Eggs, Chips and Dip, Fruit Salad (Pineapple, Peaches, and Mandarin Oranges to stick with the yellow theme), and Pigs in a Blanket (for the kids) rounded it out. It was all really easy, about two hours worth of prep the day of, and it looked gorgeous! I also grabbed some flowers while I was out to brighten up the place (and my day :D)
After the hungry mob...I buy my kitchen Baking needs in Glass or Wood when possible cause it goes with everything and lends an air of simplicity and hominess. It also allows me to use them as serving dishes :)

   All in all it was a fun day and fairly easy to pull off. I may not be a big fan of Baby Showers but I'm definitely coming around to them now. And the best part? Monkey made some new friends that day too! 
Big Sister #1


Big Sister #2


   Life isn't always easy or pretty but with the right planning it can be. That week was crazy for me but I'm glad I slowed down to do the Shower for Jessica. I learned a lot about myself, my son made some new friends, and my house hasn't looked that good in ages!


                                                           Best Wishes,
                        Jules & Hubby (He goes
      by Knight in Shining Armor too ;D)


Wednesday, January 30, 2013

On a serious note...

My Laundry Helper at 3 mos :)
                                         
     I was recently contacted by someone about posting an article they wrote concerning the various health issues that affect our Military. To be honest, at first I was kind of skeptical . Here my little baby blog was being contacted by its first guest writer solely because I'm a Military Spouse. The more I communicated with Emily however, the more comfortable I became with the idea. I had never thought about touching on the medical field in this blog but it makes sense. You see, my husband injured himself in Basic and has dealt with some "inherited" medical issues as well this past year. 


Veterans Day Parade 2011

   Everyone thinks that Basic makes our Boys stronger and more prepared but not too many realize the strain it can put on their bodies. And that is just the beginning. Every PCS brings new stressors, every Deployment new issues. I have had the blessing of being raised by a Mom who taught me to be my own Medical Advocate. Only you know your body best. Only you know when something is not right and you need to push to make sure you are not being dismissed with a treatment that may not be working. My Husband and I have worked through his difficulties to find out that he has a Degenerating Disc Disease that will not get better but can be slowed down radically. He will need more surgeries in the future but we can push them further into the future with the right type of diet and exercise. And hey, when they happen it just means I'm one step closer to being married to the Bionic Man (every girl's dream :D). Emily's article hit home with me because she showcases a lot of what we have figured out by ourselves. Hopefully, you won't have to. Her links are great resources and jump off points as well to finding the best route for you. Military Members deal with things most people couldn't even dream about. That doesn't mean that they need to suffer through alone though. There is always help if you know who to ask. 

Making Changes for a Healthier Life

Many veterans give up on their health and do not live productive lives because of different ailments they're dealing with. PTSD is a mental condition that affects most veterans and can easily disrupt a person's daily functions. Another big problem that many veterans are now dealing with is mesothelioma and many people are receiving cancer treatment for this issue. There are a few things you need to know about improving your health and living a more productive life. You can do many things to accomplish this without having to resort to solely using medications and different prescription drugs.

A great way to improve your health would be to exercise a little more than what you're doing right now. You might find that a simple walk each day after your dinner is enough to improve your quality of life and lift your mood. When you exercise, your body naturally releases endorphins that help you to feel better. Because of this, you will find that exercise is easy to add to your life and can be done in a way so that it is actually enjoyable. If you love dancing, for example, don't hesitate to join a local dancing class and see what is in store for you.

Another great way to improve your health and to avoid different medical ailments would be to diet and eat a little better. Many people have found that even making small daily changes to their diet is enough to keep them healthy and active as well as to avoid developing diabetes. You will definitely want to speak with your doctor before you actually make changes to your daily diet, especially if you are on medication or if your doctor has already established a set diet for you.

All veterans still need to visit their doctors regularly and be apart of a support group that they can turn to if they need someone to talk with. You can find a number of support groups both online and in your local area that you can benefit from making use of. You will notice that these types of changes are great for when you're looking to live a healthier life and would like to be more productive. Making these simple changes can also help you get over different ailments that you may already be dealing with so that they are not so much of an issue in your life.

   ~ Emily Walsh

   Thank you so much for taking the time to read this. If this wasn't something that could affect you directly please consider telling someone it could help. Our Military Men and Women sacrifice a lot to ensure you can live the life you want. Please take time today to help a Veteran enjoy their life. 

5 Generations of Proud Military Members, Spouses, & Children
Veterans Day Parade 2011


God Bless,
Jules & Monkey

Friday, December 28, 2012

Pancake Puffs!

   I have a toddler. Shocker right?! What I should say is I have a toddler who likes to eat from the moment he wakes up to the time he goes to bed. While I believe God made me his Mama for a reason, I must admit I don't function quite like him in the morning...My morning involves grunting noises till coffee time then I'm able to pretend to be a big girl who uses real big girl words. All this to say when my Monkey asks for breakfast 5 seconds after waking up I tend to just stare at him blankly like a weird specimen at the museum I have never seen before. Don't lie, You do the same thing with your kids! Coffee is essential in life :) 

   So I was perusing Pinterest (like all good Blue-Blooded American Women) and stumbled on Pancake Muffins from multiple sites (we call them Puffs since it's cuter and easier for Monkey to say). And dismissed them. A few weeks later I was making pancakes for the fam and realized I didn't want to stand there flipping  'em for the next 30 Minutes. So I pulled out my Mini Muffin Pan, which I love, and dumped my batter into it and shoved it into the oven. 10 minutes later my Monkey is running around the house with Pancakes, high on life. He can help himself, one batch made about 30 muffins, they travel well, store easy, and alter easy to become healthier! Ah-Ha moment if I ever had one...So I have to share it with the world. The Girls in my Sunday School class looked at me like I was changing religions when I started talking about them because seriously Breakfast has been changed forever! So here we go...

What you need:
Pancake Mix
Mini Muffin Pan


Too easy? Here's what I use:
Bisquick Heart Healthy Pancake Mix
  2 cups Bisquick
  1 1/4 cups 2% Milk
  1 Egg
  1 teaspoon Vanilla Extract
  2 Tablespoons Sugar
  Pancake Additions ~ Cranberries, Blueberries, Bananas, Chocolate Chips, etc.
I keep my sugar in a Penny Jar on the counter for easy access. Plus, it's cute :)
*Preheat Oven to 350 degrees.*


Mix everything together except the Pancake additions. When the batter looks ready for normal Pancakes then you're ready to go. 


This Batch has 8 Cranberry, 4 Banana, 4 Chocolate Chip,  & 8 Plain


Spray your Mini Muffin Pan down so things don't stick (I use Pam Butter Spray). Place whatever goodness you are adding in the bottom of the muffin cups. You only need about 2 or 3 pieces in each cup. Slice the bananas thinly and only put one piece in each cup. I use a 1/8 Cup measuring spoon to fill mine because it happens to be the right size but use what you like to fill them up to the top over the fruit and candy :)


Bake for about 10 Minutes. They will not get brown. They will get golden looking and the fruit will be bubbly. Pull them out and let them cool for about a minute and pop them out. I line a bowl with a paper towel and throw them in there. Cover the bowl with a clean kitchen towel. One batch will make about 30 Mini Muffins.


Bonus:
You can use your brand of pancake mix, change out the milk type, the fruit, etc. to make this fit your family's dietary needs and likes. Super easy, Super quick, annnnd you guessed it, Super delicious!


**Warning: This recipe causes Toddler self-sufficiency and Mommy coffee breaks to last longer.**


Us after his first Christmas Show! He was sooo Hyper!


              Happy Baking!
            Jules & Monkey


I have found some variations that I love for the Holidays! So here is your bonus round  :)

Eggnog Pancake Puffs
  2 cups Bisquick
  3/4 cup Buttermilk
  3/4 cup Eggnog
  1 Egg
  1 teaspoon Vanilla Extract
  2 Tablespoons Sugar
  Cinnamon / Nutmeg
  
   Mix all together and pour into a buttered Mini Muffin pan. Sprinkle with Cinnamon or Nutmeg, your preference, before baking them. Bake as directed above.
   We hope you enjoy your holiday breakfast rendition! Happy Holidays :)

Wednesday, December 19, 2012

Old Fashioned Stew

     I have to admit one of my favorite things in the world is curling up on the couch under a blanket in front of a fire watching my favorite shows with a hot bowl of fresh old fashioned stew. However, My Hubby and I live in Mississippi right now where winter is a whopping 60 degrees outside and a fire requires turning your air conditioning on. I love to cook but turning on the stove for too long is torture down south so I have become a fan of my amazing Crock-Pot that my awesome Hubby bought me the first year of our marriage. (Squirrel Moment: We had furniture that was on the verge of disintegrating beneath us, two pots, one pan, and a baby on the way and my Hubby surprised me with a complete splurge gift of a lifetime! I'm a complete dork I know...) So that said...I still use my Crock-Pot to make stew even in this air conditioning induced winter and this is the recipe I use...

Ingredients:
(Caveat: I use certain spices regularly so I keep them on hand at all times. Refer to the page Picky-Eaters Approved to find what they are and to get yourself a hand-dandy Grocery Shopping List as well!)

1lb Steak Cubes (labeled stew meat as well)
1/2 lb baby carrots (1/2 the bag)
4 medium sized washed red potatoes
3 stalks celery, ends chopped off
1 medium onion (your choice of type)
2 cups Chicken Broth
Water
About a 1/2 Tablespoon of each:
  Italian Seasoning
  Garlic Powder
  Onion Powder
  Thyme
  Rosemary
  Basil
  Oregano
3 Whole Bay Leaves
Salt / Pepper to taste

     Here's the best part. Grab a big chopping board / knife and a big mixing bowl. Chop everything roughly. All the odds and ends of your veggies throw into the bowl (it's my "Thank you for coming bowl" courtesy of Chef Anne on Food Network :D). Quarter the potatoes (skin on) and onions. Chop the celery into inch long pieces. Throw the meat and veggies into your Crock-Pot with the all the seasonings (except the bay leaves) and chicken stock and mix it around. Add enough water to cover your beautiful mix. Tuck your bay leaves into the sides and put the lid on. Start to finish this takes me about 5 minutes. You can increase or decrease any item you want to your family's preferences as well. Toss the bowl items into the trash and the dishes into the sink / dishwasher and you're done!

     I cook ours on low all day but we also leave at about 6am and don't get home till 5:30pm (now that I see that written down I'm starting to see why people think i'm nuts for working ;p). That said...you could cook it on high for about 6 hours and reduce it to low for the last however many if you want. This stew can't be ruined so whatever your schedule may look like as long the meat is cooked through and the potatoes are fork soft you will have done well. I serve this with the breads I make (especially the Amazing No Knead Bread) and some butter and call it a day. Easy Peasy for even the novice cook!
My Stew all done and ready to go! mmm-mmm delish :D

    Whatever you do just remember one simple thing. Your children will remember the smells and smiles from their memories more than the time it took to make them happen. Take the five minutes to make this. Your house will smell delicious, your family will have a well rounded dinner to laugh and talk over, and your child will be all smiles just from spending that extra time with you. 

Best Wishes,
Jules
My crazy family at Thanksgiving this year...
Now if only I could remember why Monkey and I are laughing so hard!